Reverb (or reverberation) is a commonly used audio effect in all kind of music and instruments. It creates an effect of the sound being played in a room, with the sound waves bouncing off the sides, creating an echo. Learning how to use this effect will give your instruments or sounds more feel and making it sound more natural.
This is what the reverb effect looks like in Ableton live 10:
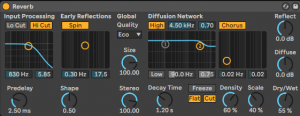
It might look quite daunting at first but the best thing to do, is to just go ahead and use it…
- Input Processing– All sounds come through this section, it filters anything you don’t want
- Predelay – The amount of time needed for the first soundwave to hit a surface
- Shape– Blends the early reflections with the tail at the diffusion network
- Early Reflections– Affects the first reflections
- Size – The size of the area the sound waves will bounce off.
- Stereo – How much reverb is coming in on both sides.
- Diffusion Network – X-Y control that creates the ‘reverberant tail’, the part of the echo that follows after the early reflections
- Reflect– Changes the amplification (volume) of the ‘Early Reflection’.
- Diffuse – Changes the amplification of the ‘Diffusion Network’.
- Decay Time – The amount of time needed for the reflection to die down to -60dB, (to fade out).
- Density and Scale – Determine how many reflections will occur
- Quality– Quality of the reverb, however high quality will affect your CPU
- Dry/Wet – Adjusts the difference between the dry signal (input) and wet signal (processed), in short, more dry = more instrument, more wet = more reverb.
- Chorus – An X-Y control that adjusts the frequency and depth of the chorus.
How to apply reverb to an instrument or sound:
Navigate towards the left side of the screen, click on ‘Audio Effects’, and scroll down until you find reverb. Now, you can drag reverb down into the bottom for the default settings, or you can click on the triangle next to it for a ‘Preset’, which is has already been adjusted to a certain room.
Now, there are many different type of reverbs, plate, hall, cathedral to name a few… You can actually find some of these in Ableton’s ‘Audio Effects’ section.