Division 4

Category: Science

Science Experiment and Scientific Method/Procedure

Science Careers | Science | AAAS

Today I would like you to try this science experiment. It’s a simple one that you can do at home and where you may be able to complete it by yourself (check with an adult). I have listed the materials and procedure below as well as some questions you can ask yourself. Please complete the worksheet or use a blank sheet of paper to record your observations and predictions.

To do this experiment you will need the items below which are the materials:

  • small paper cups, bowl or an ice cube tray
  • glass of water
  • string (yarn or any other string)
  • tape
  • small stick or a fork or object that you could tape the string to so that you have a “fishing pole”
  • salt

Here are the steps which is called the procedure: 

  1. Fill the cup or tray up with water and place it in the freezer.  You can also use ice cubes from your freezer and skip this step.
  2. When the water is frozen, remove the ice from the cup or tray.
  3. Put the ice in the glass or bowl of water. The cube will bob up and down in the water and then float on the top.
  4. Place one end of the string from the fishing pole on top of the ice cube and sprinkle salt on the ice where the string is touching.

BEFORE YOU START THIS EXPERIMENT, on this worksheet Science Experiment Report Template or a blank piece of paper, please fill out questions 1-4. AFTER YOU DO THE EXPERIMENT complete questions 5-6.

The science behind the experiment/Read this after completing the experiment:

Ordinary water freezes at (0°C/32° F). When you add salt to water, it lowers the water’s freezing temperature-it has to get colder than 0°C/32° F to freeze.

How much colder depends on how much salt is mixed in with the water. The salt you sprinkle on the ice cube lowers its freezing temperature and, since the ice cube can’t get any colder than it already is, it starts to melt. A little pool of water forms on top of the ice cube and the string sinks into it. As the ice cube melts, it dilutes the salt/water mixture in the little pool; the freezing point starts to go back up again. The ice refreezes, trapping the string. As soon as the ice cube hardens, you can raise it by lifting the string. All this happens very quickly, of course.

Try other materials like pepper or flour and see what happens! Is it only salt that works or do other substances have the same effect? Why?
Force and Motion

Force: strength or energy that moves an object. For example, if I push a box, I am using force (pushing) to move something. I can pull something like a rope tied to the box to move it too.

You can move objects through contact (which involves touching the object such as pushing or pulling something) or without touching it such as using magnets or static electricity.

Here are some videos to watch about force and motion, friction,

Force and Motion Video

Friction

This video shows how you can move an object without touching it (note that this video talks about positive and negative charges with is content aimed towards higher grades, this video is great to just show how objects can be moved without touching them): Static and Electricity

Playdough Making! Chemical Vs. Physical Changes

What are physical and chemical changes?  

Here is a short video that introduces the difference between the two: Physical/Chemical Changes Video

Example of Chemical Changes Video

If you aren’t able to watch the videos: 

Physical Change: 

  • waking, cooling, cutting, bending, stirring, mixing
  • materials may be combined or physically changed to be used in different ways (for example: plants can be ground up and combined with other materials to make dyes)

Chemical Change: 

  • cooking, burning, etc.
  • materials are combined to form a new substance- a chemical reaction is created which forms the new substance and can’t be reversed or undone

Optional: Try it at home with an adult! Below is a recipe for play dough that I use for the classroom, see if you can identify when you see a physical change and when you see a chemical change! Can you think of some other examples of physical and chemical changes that you can see at home besides baking or cooking? 

Materials:

  • 1 cup of flour
  • 1/4 cup of salt
  • 3/4 cup of water
  • 3 tablespoons of lemon juice
  • 1 tablespoon of vegetable oil
  • Food colouring
  • Any seasonings or scents you would like

Directions:

  • Add the water, oil and lemon juice to a medium non-stick pot and heat on medium heat on the stove (maybe even slightly lower heat depending on your stove).
  • Add food colouring, liquid scents or Kool-aid to the water mixture.
  • In a mixing bowl, combine the flour, salt and any dry seasonings you are using.
  • After the water is hot, but not boiling, slowly add the dry ingredients to the pot and while mixing to combine. I use a wooden or plastic cooking spoon.
  • Continuously stir until the ingredients combine, dry out and begin to form a ball. If there are parts that seem a bit sticky still, just flatten the dough out and put the sticky side down on the bottom of the pot very briefly. Flip back and forth frequently until it doesn’t seem sticky anymore. However, don’t cook it too long. It is better to be a bit undercooked as it will firm up as it cools down.
  • Place on a sheet of wax paper until it cools down a bit. Then knead the dough for a minute or two to bring it all together.

Water Cycle-Review

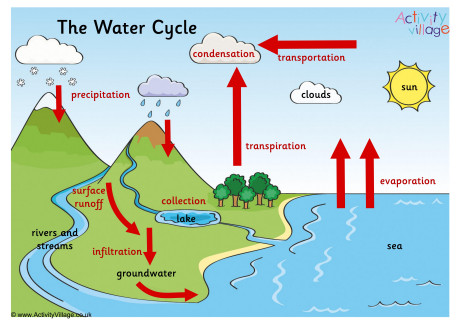
Before we left school for Spring Break, we had started talking about the Water Cycle! Before watching the video and looking at the song, diagram and worksheet, think about what you remember about the water cycle. What parts do you remember? Can you describe what’s happening in each stage? Can you name some sources of water? (One source is the ocean).

Below is a video to remind you of the parts of the water cycle, a song that you can learn to help you remember the key parts of the water cycle,  a diagram of the water cycle, as well as a worksheet that you can print and complete (or figure out the answers and say them verbally).

Video: The Water Cycle

In the video the last stage they talk about is Collection; we have called this Accumulation in our class. Accumulation refers to water that did not get evaporated or absorbed into soil. The process leading to Accumulation is called Runoff.

Water Cycle Song: Water Cycle Song

Water Cycle Diagram: Water Cycle Diagram

Water Cycle Worksheet: Water Cycle Cut and Paste Worksheet

The Water Cycle

© 2024 Ms. Chin

Theme by Anders NorenUp ↑