Module Two Post Two (Going deeper into techniques of 2 point persepcetive)

Once again, I am not using a website, as I felt that I needed to write a new post to go deeper about the techniques I breifly mentioned in post sixteen. My art teacher, Ms.Lehtonen did a whole unit about perspective drawing. In that unit she taught us how to draw in that way and how the mathematical techniques that are used.

I already mentioned that you always need to use a ruler, but that is not all. There are only certain amount of lines that are used. these lines are vertical, and diagonal pointing to either of the vanishing points. These lines will create angles which will help you know how big the other corners will be. The angle made in one corner of ( a building ), will be the same as the all the corners that look like they are in that position.

Image result for two point perspective

This image greatly describes how each corner is the same as if a mirror is placed between each horizontal line, the other corner will be equal.

Module One Post Fourteen (math in art)

This time I substituted the website for a video, and it clearly explains drawing perspective in math. You need geometry, and angles to make sure everything is in proportion.

In one point perspective, when you are drawing the object like a cube, the lines has to create a 90 degree angle. After, the lines that finish up the cube have to be parallel to each other. All of the lines have to be straight too. (unless you are drawing 0 point perspective.)

As you watch the video, you can see that first, the basic shape that defines the soon to be cube is  2d. When you form the cube, it turns into a 3d shape.

Module One Post Twelve (perspective drawing)

There are a few rules to when it comes with linear perspective. One, is objects that are closer seem bigger than farther away. The second one is parallel lines connect at the horizon.Even though in real life the lines don’t intersect, but that just how the parallel lines translate onto the paper.

When you are drawing linear perspective, you really need to think about how big and small object are in the scene.

Here is the video the website provided for us to further understand the topic.

http://draw23.com/perspective

Module One Post Eleven (steps for perspective drawing)

This website goes through the steps on how to draw in perspective. You need these basic factors when you are drawing this way. Every time you are drawing perspective (it doesn’t matter what kind) you need a vanishing point, and a horizon line. For one point, only horizontal, diagonal, and vertical. For two point, you can only use diagonal, and vertical (excluding the horizon line).

In one point there is only one vanishing point and for two, its two points. All of the architectural lines should point to either of the vanishing points. If one of them are pointing somewhere else, you are doing something wrong.

This website also talks about zero point perspective, which I haven’t seen in any of the other 10 websites I have visited. In this case, there is no vanishing point, so there are lots of organic lines (non geometrical). It is used in landscape drawings where there are no parallel lines.

Basically, everything close should be big, and get smaller the further it is away. There are 4 types of perspective that are one point, two point, three point, and zero point.

https://www.wikihow.com/Draw-Perspective

Module One Post Eight (math in drawings)

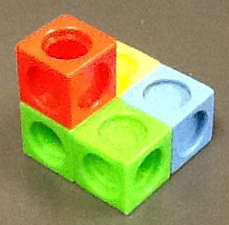
This website mostly talks about the mathematical aspects in perspective drawing. There are about three mathematical things to look for next time you see a drawing. They are the relationship between the lengths of the edges of the cubes, the angles between them and parallel and perpendicular lines.

multilink structure

Here is the picture the website provided us. As you take a close look at the picture, you can observe the angles and lengths of the cubes. Also the way the lines point and how the angles are, looking this way at the cubes.

https://nrich.maths.org/8399

Module One Post Six (Different ways to view drawings)

This website I can say is probably the best website I have come across so far. It talks about all of the aspects and elements of math and the geometry in perspective drawing. It also has easy to understand descriptions.

there are many ways you can look at a drawing such as upward, downward, and eye level. for an example, you are drawing cubes, and looking at it from an upward perspective, the vanishing points will go downwards, making the illusion of looking at something higher than you. If you remember from my other posts what vanishing points (where the lines disappear, because it has gone too far away to see) and vertices (where two lines meet) are, this will be easier to understand. 

The left drawing shows looking downwards, and the right one is showing how the lines and cubes work when you are looking up at something.

 http://www.dummies.com/art-center/performing-arts/drawing/drawing-geometric-perspective/

Module One Post 2 (M.C Escher: A mathematical artist)

http://www.mathaware.org/mam/03/essay3.html

PART 2

Famous artist M.C. Escher was born June 17, 1898 in Leeuwarden, Netherlands. M.C. Escher created an art style that played with orientation and space. Later embraced  by both artistic and math/sciene communities.M.C. Escher died march 27th 1972.

M.C. Escher’s art often was perspective art and he used lots of math related techniques like the golden ratio, and using diagonal lines to create a perspective.

personally M.C. Escher is one of my top 3 favourite 20th century artists the other two being Salvador Dali and Keith Haring

Image result for mc escher art

(“relativity’ by M.C Escher 1953)


Module One Post Five (sidewalk art)

The last website I chose talks about what perspective is. I also provided a video to support what it says. In the website, it says that perspective has different ways it presents itself, as it has one to three vanishing points. when you do perspective, it used math called  projective geometry.

The video i got talks about how in 3D sidewalk paintings, if you look right above, it will look extremely distorted, but from the side however, it looks like it is popping up. this all works because it uses mathematical techniques old artists used back then, and what we still use today.

http://mathworld.wolfram.com/Perspective.html

Module One Post Four (dividing space)

When you are drawing in perspective, you need to figure out how far apart certain lines need to be. If you are drawing something that occurs in a pattern, like telephone poles, the objects get smaller and closer spaced the farther away it gets.

Perspective

This website just talks about the lines, and steps you need to place on the paper to complete your drawing. The factors that applies every time you are drawing this way are  vanishing points, and a horizon line.  You need both of these factors to draw realistically.

http://www.craftsy.com/blog/wp-content/uploads/2013/07/Screen-Shot-2013-07-09-at-9.01.43-AM.png

Module One Post Two (Paintings that use perspective)

The second website I came across is written by    .  He talks about how painters use perspective to create depth, and to show if something is far away, or up close. Painters use variations of perspective such as two-point perspective, three-point perspective, and atmospheric perspective. When you are drawing to create depth, it involves ratios of the different lines and shapes. 

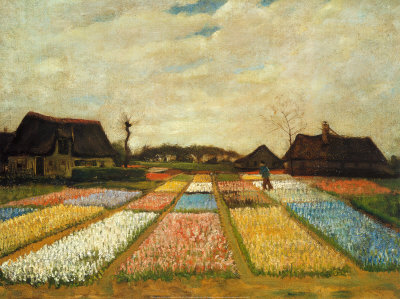
Painters such as  Vincent Van Gogh used perspective in his painting Flower Beds in Holland use these techniques to make it look like a photograph.

The Mathematics of Perspective Drawing