Pa Salieu

a) Pa Salieu is a rising rapper from the UK. He was born in Slough but soon moved to Gambia with his parents. He spent his early childhood there and when he was 8, moved back to London with his mother. His auntie was a folk singer, who he says heavily inspired his musical career.

Pa Salieu feat slowthai – Glidin’ (Official Video) – YouTube

b) Salieu started taking music more seriously in 2017 and in 2018 he attended a local youth club where he started producing some of his own music. In 2020 Pa released a mixtape named ‘Send Them To Coventry’. On it he collaborated with other big UK artists such as slowthai and M1llionz, which helped him gain lots of recognition. However, it was his hit ‘Frontline’ that made him really blow up.

c) Signed by Warner records. On his website he uses ‘songkick’ to promote his shows and tours.

d) I think his career will last a long time, his songs are blowing up and now he is making music with other artists like SL, BackRoad Gee and Aitch. Pa is making a sustainable amount of money from his music. Furthermore, in early 2021 he performed ‘Frontline’ on Jimmy Fallon, showing how he is gaining fame not just from the UK but from other countries too. Furthermore, ‘Frontline’ was the #1 most played song on multiple radios such as BBC 1Xtra and Rinse FM.

Pa Salieu – Frontline (Music Video) | @MixtapeMadness – YouTube

e) I think his entrance is repeatable, however I think his rise was more based on luck. On the other hand, his unique voice and musical style makes him really stand out from the crowd.

Pa Salieu – My Family feat BackRoad Gee (Official Video) – YouTube
f) Pa Salieu – Wikipedia

Pa Salieu

Pa Salieu | Noisey Raps – YouTube

Pa Salieu Biography, Songs, & Albums | AllMusic

Guitar Recording Techniques

Usually electric guitars are recorded with a dynamic microphone, with it being right in front of the amplifier.  Experiment with the distance between the microphone and the amp and see what you like the most.

Condenser microphones are usually used for acoustic guitars. There is a little bit more creativity when it comes to acoustic guitars. The diagram below shows how the sound will change depending on the location of the microphone. The most important part here is to not put the microphone too close.

Condenser microphones can be used (for all types of guitars) and placed further back from the source to pick up the reverb that is created by the room.

If you have two amplifiers, or an amplifier with more than one speaker, you can record each speaker with a 2 different microphones (make sure they are the same model) on 2 different channels. After that you can pan one far left, and the other far right, this will create a strong stereo effect.

Shure BETA 52A

Price: $189.00

Type: Dynamic Microphone

Polar Pattern: Super cardioid

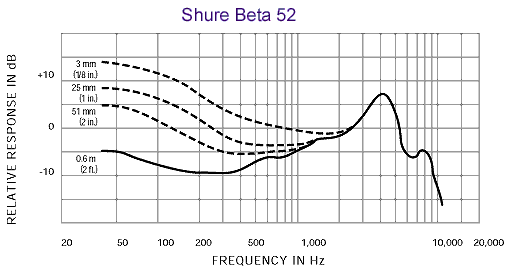
Frequency response pattern:

See the source image

Perfect for kick drums and great for bass instruments

Sensitivity: -64dBv/Pa

Maximum SPL: 174dB


Jean Michel Jarre

Jean Michel Jarre is a French composer/musician who evolved electronic music, his heavy use of synthesizers gave him a distinct sound that gained him his popularity. His live shows perfectly blend with his music, containing lots of lasers fireworks and pyrotechnics.

How to use reverb in Ableton Live 10

Reverb (or reverberation) is a commonly used audio effect in all kind of music and instruments. It creates an effect of the sound being played in a room, with the sound waves bouncing off the sides, creating an echo. Learning how to use this effect will give your instruments or sounds more feel and making it sound more natural.
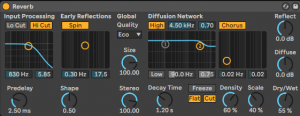
This is what the reverb effect looks like in Ableton live 10:


It might look quite daunting at first but the best thing to do, is to just go ahead and use it…


  1. Input Processing– All sounds come through this section, it filters anything you don’t want
  2. Predelay – The amount of time needed for the first soundwave to hit a surface
  3. Shape– Blends the early reflections with the tail at the diffusion network
  4. Early Reflections– Affects the first reflections
  5. Size – The size of the area the sound waves will bounce off.
  6. Stereo – How much reverb is coming in on both sides.
  7. Diffusion Network – X-Y control that creates the ‘reverberant tail’, the part of the echo that follows after the early reflections
  8. Reflect– Changes the amplification (volume) of the ‘Early Reflection’.
  9. Diffuse – Changes the amplification of the ‘Diffusion Network’.
  10. Decay Time – The amount of time needed for the reflection to die down to -60dB, (to fade out).
  11. Density and Scale – Determine how many reflections will occur
  12. Quality– Quality of the reverb, however high quality will affect your CPU
  13. Dry/Wet – Adjusts the difference between the dry signal (input) and wet signal (processed), in short, more dry = more instrument, more wet = more reverb.
  14. Chorus – An X-Y control that adjusts the frequency and depth of the chorus.


How to apply reverb to an instrument or sound:

Navigate towards the left side of the screen, click on ‘Audio Effects’, and scroll down until you find reverb. Now, you can drag reverb down into the bottom for the default settings, or you can click on the triangle next to it for a ‘Preset’, which is has already been adjusted to a certain room.

Now, there are many different type of reverbs, plate, hall, cathedral to name a few… You can actually find some of these in Ableton’s ‘Audio Effects’ section.